Thanksgiving is coming up real fast – faster than I would like – and we’re getting heading into “you better decide what you’re doing now” territory for Thanksgivings planning. Until now our only turkey making options have been the bake-in-the-oven variety, but I recently got the opportunity to try out Masterbuilt’s Butterball Indoor Turkey Fryer to try frying a turkey for this Thanksgiving.
I did a test run of the turkey fryer this weekend to try it out before we cook a whole bird. I made fried turkey breast, undocumented french fries and corn fritters. Let’s go on a little adventure and see how this sucker works!

[Dad figuring out the plug with the turkey fryer set up on the stove]
This deep fryer is an electric turkey fryer and can be used indoors, creating a safer and easier option for turkey frying. No crazy outdoors setup with a propane tank with the risk of tipping it over and catching on fire!

[Masterbuilt Butterball Indoor Turkey Fryer]
This sucker is pretty big and can safely hold up to a 14lb. turkey. You use 2 gallons of oil for one turkey and it gets fully enclosed with a drop in basket and a lid to shut the fryer while the turkey is cooking. A thermostat on the front easily let you control the temperature and lets you know when the oil is ready. The timer counts down for you and beeps when ready. The instruction manual that comes with the fryer also has some handy preparation tips, suggestions and other recipes for this fryer (which can also be used as a steamer).

[Filling up the fryer with peanut oil]
Since I was only cooking a turkey breast for my first try, I didn’t need to fill it up to the max line. I went about halfway to max. I used peanut oil since it’s got a high smoking point and imparts a nice flavor to whatever you’re frying. The house totally smelled like peanuts while the oil was heating up!
It can take up to a half hour for a full 2 gallons to get up to temperature – since I used a little less, it took about 20 minutes to heat up the oil to 375 degrees.

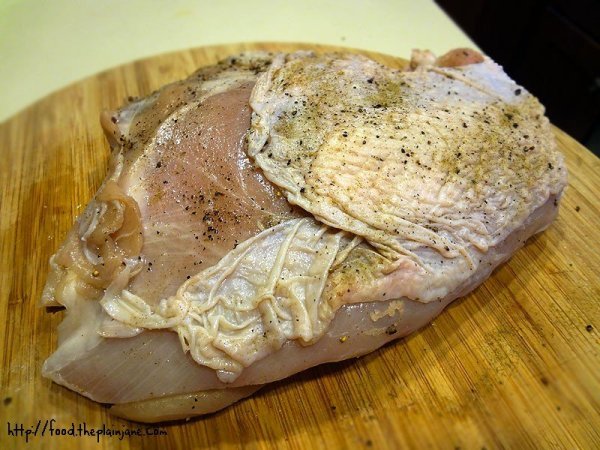
[Turkey breast preparation for the fryer dry run]
When preparing your turkey, you must ensure that your turkey is completely defrosted. Ice and water will definitely not mix with your hot oil! I prepped my turkey breast by patting it completely dry and adding salt and pepper all over the outside.
When cooking your bird, you may want to brine it first before doing a deep-fry – and if this is the route you go, make extra sure your turkey is patted dry and free of any brining liquid.
You can also inject the turkey will extra seasonings but I was kind of a lazy pants and just did a plain old breast!

[This turkey breast is getting ready for a hot oil bath]
My 2 and 1/2 pound breast was placed into the fryer basket. There’s a little lip on the side where the basket is held up above the oil. It comes with a lifter to help you ease the basket in and out of the fryer. I recommend trying to lift the basket in and out before you even get to this step just to see how it works. I found that I had to move the basket forward for it to slide easily down and had to practice a few times catching the handle. Nothing too hard, but it’s good to practice before there’s hot oil bubbling angrily in your face.

[bubbles!]
I carefully lowered my turkey breast and watched the bubbling begin! Then I shut the lid and began the short wait until my turkey would be done.

[Turkey fryer’s control panel]
The green light comes on when the oil has reached the proper temperature and is ready to deep fry your treats to a golden brown.
The instruction manual recommended that for turkey breast only, the temperature be dropped to 325 while it’s cooking. This isn’t something you do with a full turkey though – just the breast! I set the timer and cooked the turkey breast for about 17 minutes (about 7 minutes a pound). A normal, full sized turkey will take about 4 minutes a pound to cook and the temperature stays at 375 degrees.

[Freshly fried turkey breast]
The turkey cooked up pretty quickly and when I lifted the basket up, this is what my eyes feasted on – golden, brown deliciousness!

I let the turkey breast rest for about 10 minutes while I also cooked up some french fries (mmm, french fries cooked in peanut oil!).
The first time I did this, I undercooked the turkey slightly (I cooked it for 14 minutes then added an extra 3 minutes of cooking time). I loved the golden, crispy outside skin on this sucker but I really wished I had brined, injected or seasoned the breast a bit more liberally. Salt and pepper alone didn’t quite do this thing justice and since I do prefer dark meat, it wasn’t my favorite turkey… but it was still pretty good. If they just sold dark turkey meat for frying this would have probably been more perfect, but I didn’t see any of that on the shelves. We’ll still be trying out frying a whole turkey for the big day and this dry run helped us to learn what else we needed to do for a flavorful turkey!

[John McLemore’s cookbook]

In addition to the turkey test, I also used the fryer to create a recipe from John McLemore and his cookbook, “Dadgum! That’s Good, Too!“. The cookbook is pretty much created to pair with the turkey fryer, providing a whole section of “fried foods”. A lot of the recipes have stories and photos of John and his family with them, sharing a story behind the recipes.
Flipping through the book for ideas, the corn fritters called to me and demand that I create them. They seemed like an easy side dish to create for a little BBQ we had over the weekend with Jake and his family.

[Corn fritter batter]
The corn fritter batter came together very easily. I kind of wished I had tried this with creamed corn … we’ll save that idea for next time!

[Floating corn batter]
Spoonfuls of corn fritter batter were dropped into the hot oil. At first I put them in the basket and lowered them, but it seemed more efficient to just drop them by the spoonful.

[Starting to get golden brown]
After a few minutes, the fritters need to be flipped over if they don’t flip on their own. I got Jake to do this part for me since I had to stand on my tiptoes just to peer down into this thing.
Curse my short height.

[Pulling the fritters out of the fryer]
It only takes about 6 minutes to get these lovelies to a golden brown. I fished them out with a slotted strainer while I finished up the batch.

[Corn fritters ready for hungry mouths]
A little extra dash of salt and these babies were ready to go! They had a nice, slight sweetness to them and puffed up really nicely.
I think a little extra seasonings would be a fun variation – maybe a little paprika, garlic salt, or cayenne for a spicy mix. Everyone really enjoyed the fritters as-is though, proving it to be a winner!
I also liked how easy and fast it was to fry them – though I don’t think I’d break out this big old fryer for only cooking fritters!
The turkey fryer has a drain valve to easily remove the used cooking oil once your done with all of your frying. Many of the elements of the fryer are also dishwasher safe (your manual will tell you which parts can go in the dishwasher) for easier cleanup.
The one downside I see to the fryer though is that this thing is HUGE. It’s not something we’ll keep on the counter and will probably need to store it in the garage once we’re done with it.
I did like that this unit can be used for more than just deep frying – there were recipes for a low country boil and steaming chicken and veggies – a nice option for large dinners and get togethers that don’t involve frying making it a multi-purpose product.
The Masterbuild Turkey Fryer is available at Wal-Mart, Home Depot, Amazon and several other local retailers if you’re thinking of picking one up for your Thanksgiving dinner!
Recipe below for the Corn Fritters!
Continue reading “deep fried turkey and corn fritters for thanksgiving”


